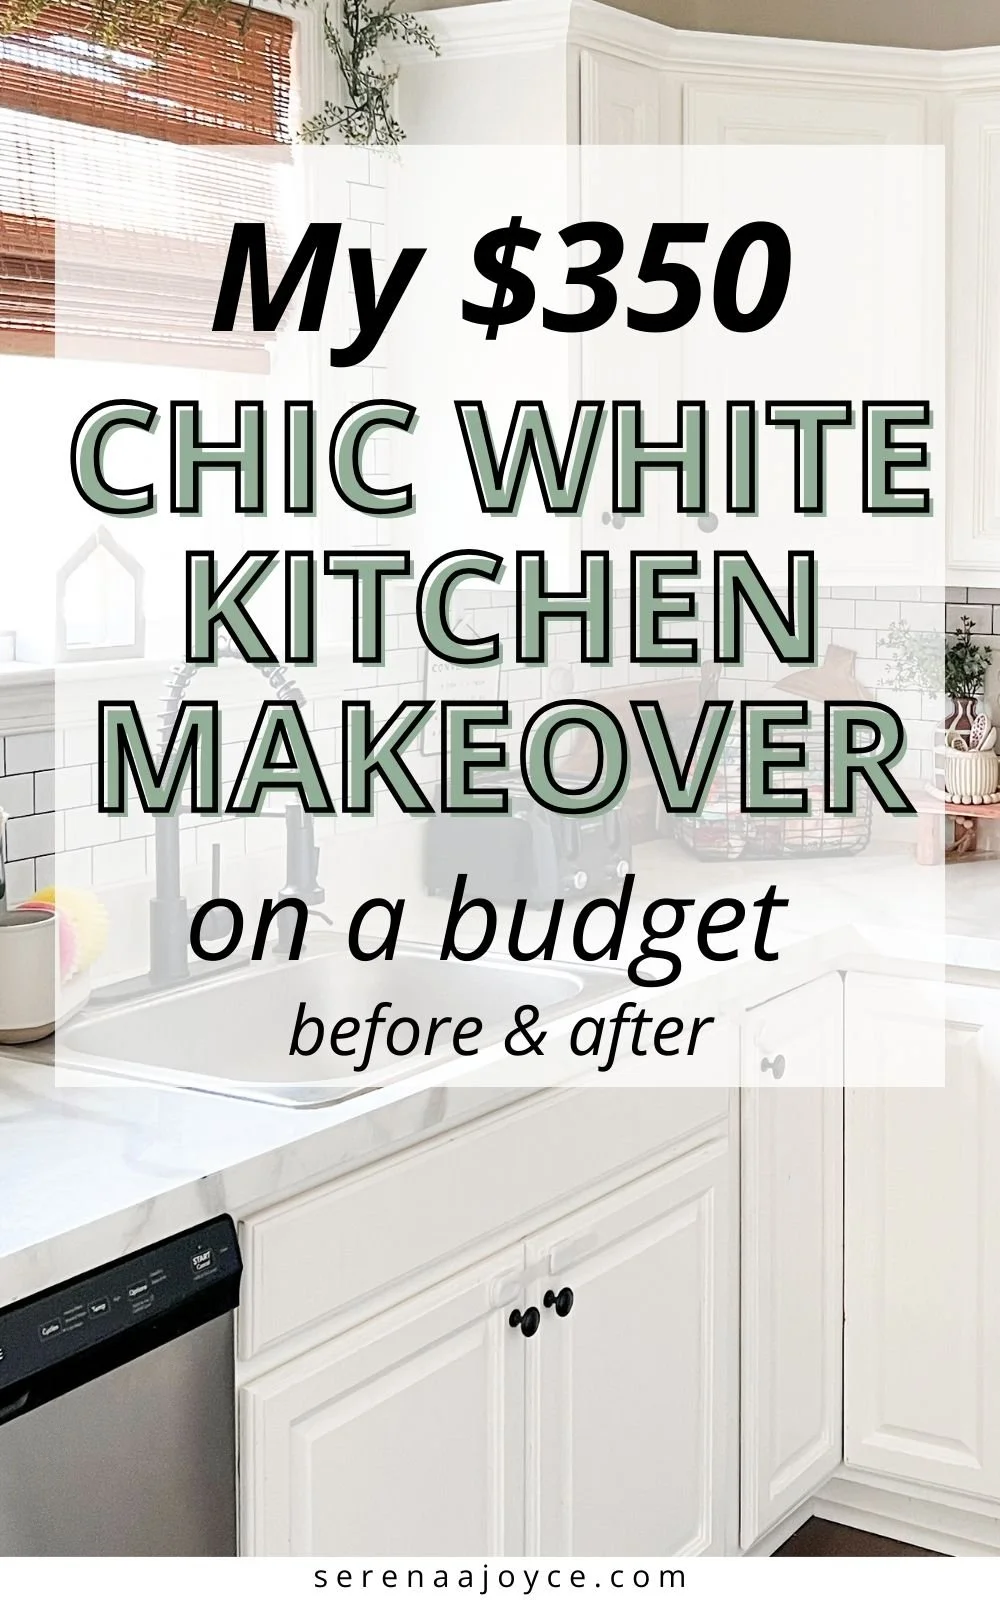
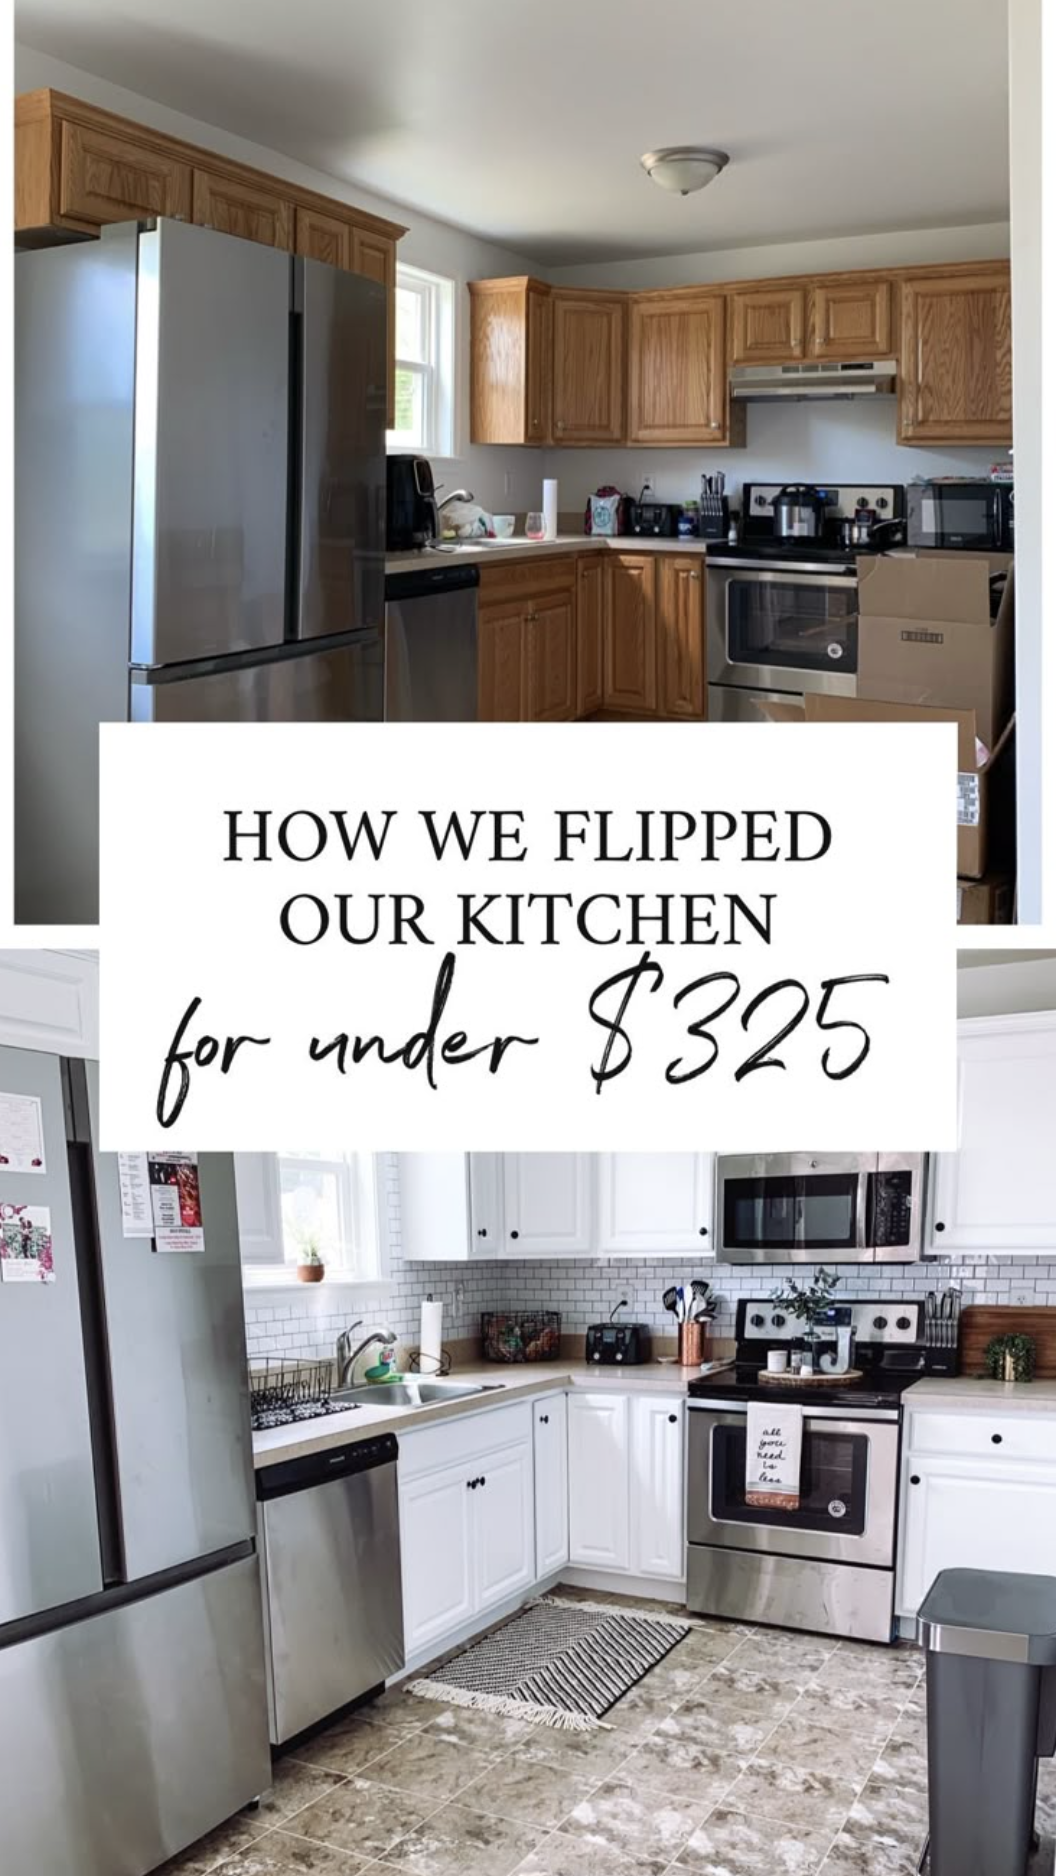
How We Did A DIY Kitchen Renovation On A $350 Budget
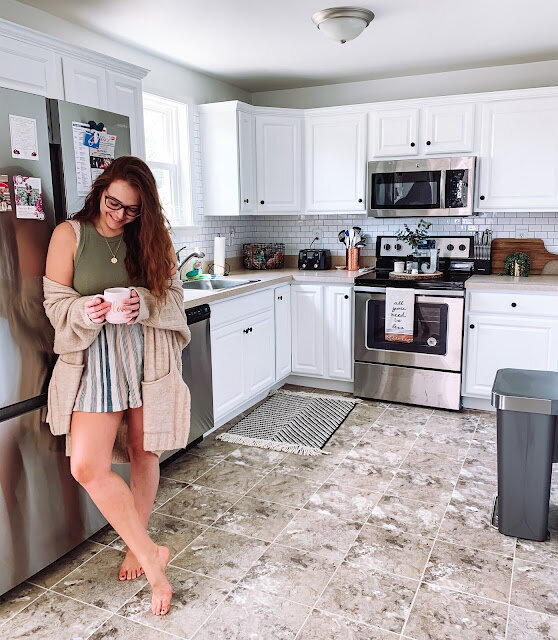
When my husband and I were in the process of buying our very first home together, one of my requirements was that I really wanted work on a project together and work on a DIY kitchen renovation with whatever kitchen we ended up with. I've always dreamed of having a "modern" all white kitchen for so long now. There's just something about the color white that I love. I think it makes a space feel fresh, bright, and like you can do anything to it.
*This post contains affiliate links. I may or may not make a commission from a purchase at no extra cost to you.*
So we set a budget for our ugly, brown kitchen to redo the kitchen cabinets, fake tile backsplash, and change out the hardware. We managed to have a successful DIY kitchen renovation UNDER budget for a grand total of $307 with all of these products!
I'll break down all of our costs below. To be honest, it looks like a completely different kitchen.
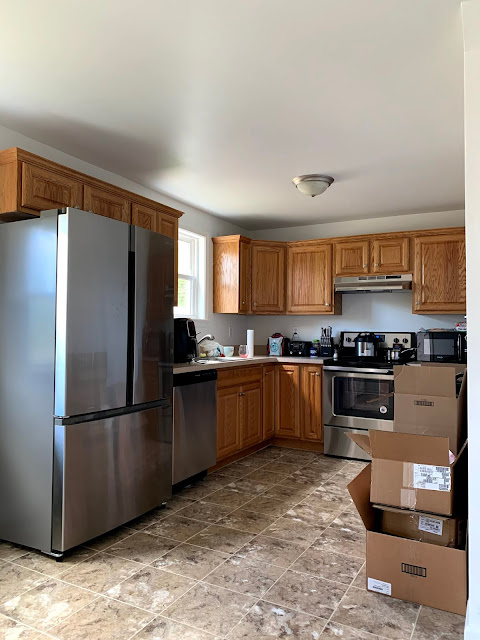
When we bought the house we ended up with, the kitchen was actually just renovated. The home was a flip, and the sellers had put in all new brown cabinets, and flooring. Don't get me wrong, the kitchen was beautiful, but we wanted to be able to add our own touch to the home to make it ours! Plus, my style has always been Farmhouse, and I finally wanted a kitchen in my life for once that I was proud of, and that was mine. I had so many remodel ideas for it.


Step By Step: DIY Kitchen Renovation
PAINTING KITCHEN CABINETS
Step 1: Collect all supplies
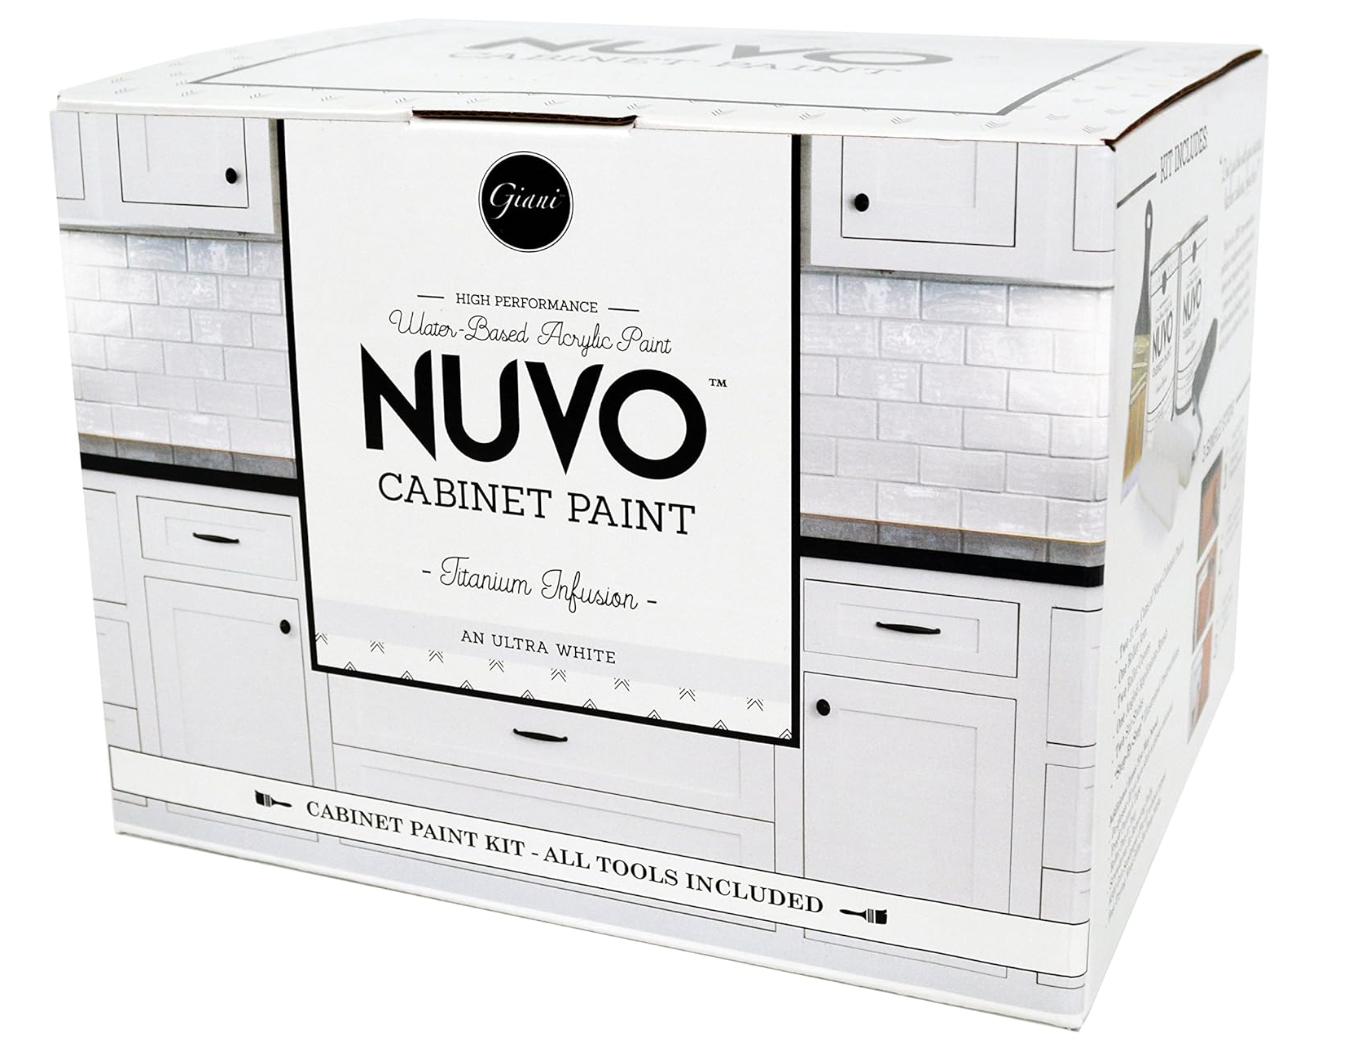
We started off with this kit for some of the basics. Typically in most kitchen renovations, you should sand your cabinets to get rid of imperfections/grains/etc, but we decided to skip that step. We liked the wood look, and went with this all in one kit which included a roller, roller cover, brush, instructions and of course paint. We only needed one can. ($69.95)
Here is everything else we used:
(PRICES CAN CHANGE AT ANY TIME)
PAINTERS TAPE: Essential! We used this around all of our appliances, walls and the floor so the paint job would look crisp and clean. I recommend getting something wider than we did though. We ended up needed paint remover afterwards. ($6.48)
SMALL PAINT BRUSHES: These are essential for getting in crevasses, and evening out paint brush strokes. We bought 2. ($1.26 each)
FOAM BRUSHES: We picked these up this 6 pack as well to allow paint to get in all the wood grains, and they ended up being my most used brush. ($5.98)
PAINT ROLLERS: The kit only came with one roller, but we bought a few more for extras. These will be essential in getting the larger parts of your cabinets/frames. Makes the process go quick and easy! We picked up a small set that came with a few brushes and a roller. ($5.57)
PLASTIC SHEETING: I definitely recommend getting this if you don't want to get paint on anything! We painted on our dining room table, so we covered the table and floor in this, as well as our garage floor. ($7.59)
PAINTER'S TRIPODS: These are used to prop your cabinets up to dry. We used these in the very beginning, but didn't really find them that helpful. The cabinets kept falling off, and we had way more cabinets than tri-pods. We ended up finding small boxes we had from moving, and propped the cabinet up with boxes. ($10.46)
PAINT TRAY: Used to hold the paint, and to dip your roller brush in to get a good coat on the brush. ($6.98)
PAINT REMOVER: We should have gotten thicker painter's tape because we did end up getting paint on some of our appliances. This came in handy to easily remove it. ($7.98)
HARDWARE: The fun part! We ordered our hardware from Amazon, because it was a bit cheaper than Lowe's or Home Depot. We got a 25 pack for under $30! The quality is fantastic. They are metal/heavyweight, and went on super easy. ($28.97)
SCROLL BELOW TO SHOP


Step 2: Prep the cabinets
TAKE OFF ALL CABINET DOORS/HARDWARE: We put all of them in our garage over plastic sheeting as well in our dining room over plastic sheeting. We also made sure when taking each individual cabinet off to name it so that we could label it with tape and match it with the corresponding hardware. This is super important so that you aren't scrambling trying to figure out what hardware goes to what cabinet. We put all the small pieces in plastic bags and called it the same name as the corresponding cabinet.
WASH CABINETS/FRAMES: You want to make sure you remove all grease and dirt before putting a fresh coat of paint on.
SAND/PRIME (OPTIONAL): Most people would tell you to sand if you want flat cabinets and so that the paint has something to stick to, but we chose to skip both of these step because the paint we got this Cabinet & Furniture Paint Kit which required no sanding or priming.
TAPE: Tape around all appliances, countertops, etc so that you have nice, neat, clean lines.

SCROLL BELOW. TO SHOP
Step 3: Start the cabinet painting with this cabinet paint kit
CABINET DOORS: We started only with the top cabinet doors first. We used the roller to get the main area of the cabinets, and then I took a sponge brush to get in all the places the roller wasn't able to reach. Most of our cabinets ended up required 4 coats with the paint we chose until we were happy with the shade of white. It typically takes 4-8 hours for the paint to dry, so we were able to do 1-2 coats per day.
CABINET FRAMES: While we would wait for the cabinets to dry, we began painting the frames. Since the cabinet doors cover most of the frame, we were happy with 3 coats. I would say painting the frame was the most tedious part because it was so large. Again, we used the roller for the main areas, and I used the sponge to get in the wood grains, and corners.


SCROLL BELOW TO SHOP
Step 4: Add hardware/Finishing touches
Start to re-install all cabinet doors back on to their original location. We used these really affordable black matte pull knobs. This was my favorite part, and really made the new cabinets come to life.
We also added on new padding to the backside of the doors so they don't slam and ruin the paint. We picked these up for $1 at Dollar Tree.


DIY FAKE KITCHEN BACKSPLASH
This part was actually the most "costly" part of the entire process.
We picked up this peel and stick tile backsplash tile up from Amazon, and y'all... It's AMAZING!
Can you believe our tile isn't even real? We were so impressed with the quality, and how it makes our kitchen look.
I thought when ordering, it was going to almost be more like a wallpaper... Nope!
It has the real texture of subway tile, as well as it's very thick, and has a clear top layer that has a wipeable surface for an easy clean.

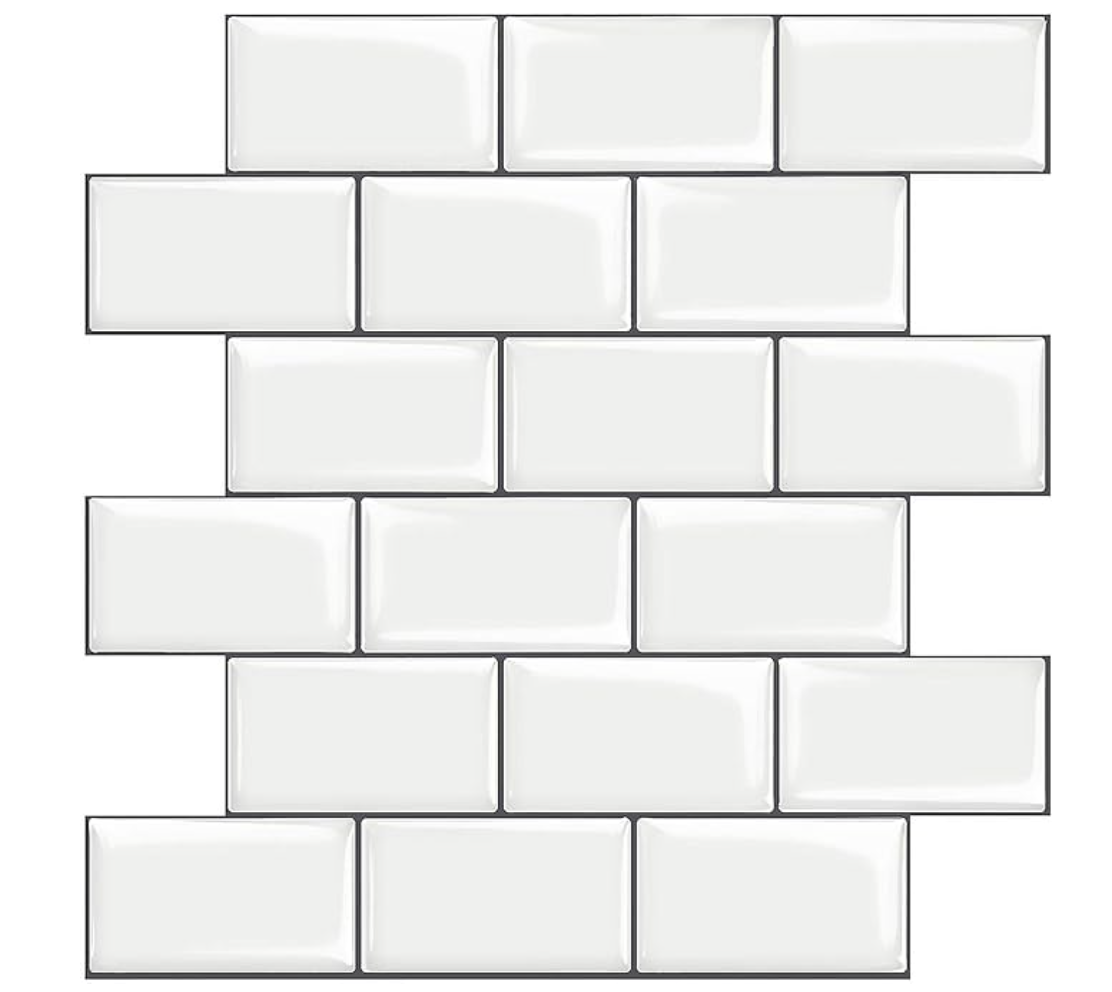
STICKGOO 10-Sheet White Subway Tiles Peel and Stick Backsplash, Stick on Tiles Kitchen Backsplash
1) Collect Supplies
BACKSPLASH: There a ton of options to choose from when it comes to ordering backsplash. We went with a stick and peel because we didn't want to spend the extra money to hire someone to come out and do real backsplash, and also we didn't know how to do it ourselves, nor did we have the tools. We looked at our local Lowe's and Home Depot, and none of the options were what we were looking for. So instead, I stumbled upon this stick and peel tile from Amazon. You can order it in packs of 1, 5 or 10. We ordered 3 packs of 10 ($56.98/each), and ended up using 28 out of 30 tiles. ($170 total)
SCISSORS/EXACTO KNIFE: You will use these to cut the tiles in order for them to fit in certain areas of the wall. Around the bottom frame of our window was the hardest part. ($5.49)
WASH THE WALLS: Just like prepping for the cabinets, it's all important to prep/clean your current backsplash or wall to get rid of all dirt or grease. This will enable the tile to stick better.
RULER: To measure areas you may need to cut, or cut around for spacing.
DRY ERASE MARKER: This will make your life so much easier when you need to mark down measurements etc since the surface is wipeable.
2) Stick it on!
PUTTING ON THE ADHESIVE BACKSPLASH: The tile came in 12"x12" pieces. They each fit together like a puzzle which was awesome, and made a lot of the process go very smoothly!
CUTTING/MEASURING: We had to cut for the corner walls, under the window, and holes for the outlets. This took a lot of measuring. We stuck them on the wall like a puzzle for the entire bottom row of the kitchen. For the 2nd row I had to cut the tiles down much smaller so they would fit right below the cabinets since there was less than 12" of space left.


Since I had so many extra tiles left over, I decided to go up the sink wall.
Originally I wasn't going to, but didn't want the rest to go to waste.
I'm SO glad I did, because I just love how it came out! Really adds that extra wow factor to the kitchen by going all the way up the window.
I still ended up with only 2.5 tiles left :) Maybe I'll find some small space in the house sometime to use them.

All in all, this process took us about 2.5-3 weeks total because of our busy schedules.
Our kitchen is still not fully finished as I still have a ton of decor I want to add, and spice shelving, but for right now, I truly love walking into this new space everyday. It feels so fresh, clean, and like ours.
I hope this post was able to help give you ideas on how to potentially re-do your own kitchen if you've been looking for a DIY project of your own :) Feel free to reach out to me if you have any questions!
SHOP THE POST BELOW: